CLICK HERE FOR FREE BLOGGER TEMPLATES, LINK BUTTONS AND MORE! »

Tuesday, July 29, 2008

Nature's Beauty


My husband's favorite bush in our yard. We first moved to the desert SW 3 years ago from Colorado. My husband had told me stories of his days spent here long ago (I do mean long ago) as a young Army soldier. He was so enamored at coming back to this part of the country that, well, quite frankly, what could a dutiful wife do, but follow her man. I mean, after 31 years of following, it was just natural.

Then, upon my arrival, I was so stunned at what my hubby considered beauty that I just knew he must have lost his mind while he had been deployed that previous year. I remember thinking, God was surely punishing me for something or had an odd sense of humor. It all seemed so colorless, desolate and bleak to me at the time, and of course, I came during the "windy" season and precious does not like her hair messed up in the wind. There were times I just new the wind was going to cause the house to implode. Ok, a slight exageration, but you get my point.

After six months of whining I finally settled into our new home with a renewed sense of purpose. If God wanted us here, then there had to be a plan and I needed to stop my whining and get on with it. Once I started letting go of my preconceived notion of nature's beauty, I was able to open my eyes and see that the desert can be a wonderful place. Why DID people love it here so much anyway?

First of all, we certainly didn't need those heavy winter coats any more and throw away those snow shovels. Where else can you have near perfect weather? Ok, the summers do get hot, but after getting through that first summer, I realized, it wasn't so bad afterall. You learn to get up early, get your shopping done and get home before the temperature rises.

Now here just over 3 years, we have found our blessings have increased over and over. We've found the most wonderful church and christian friends and discovered all the people to be open and welcoming. We've also found the beauty in the desert itself. It wasn't until recently that I personally realized just how much I do love it here. When I sent some photos to a friend in Wisconsin and she commented on how brown it was here and I found a need to defend our turf, I knew that God had truly changed my thinking. My response was that it wasn't always brown here. We have our monsoon season for sure (in the middle of it now), but when the desert blooms in the Spring it is the most wonderful thing to see. Color is everywhere!! White, yellow, lavendars, greens; it's all there if you just let yourself see it.

I'm thankful that I opened my eyes to the beauty of the desert. The beauty that my husband saw all those years ago and still does today. The beauty of knowing that not everything beautiful is green and the beauty of a more casual lifestyle. Today, I feel as if we have been here forever and belong here just as long.

Thanks, honey for convincing me to follow you once again!!

Monday, July 28, 2008

Burp Cloths


I just finished these embroidered burp cloths for a friend's daughter. I just love these animals and their cute little faces. It's from the Whimsical Kingdom set of embroidery. They go with her fabric selection of jungle animals for the baby quilt I finished for her. I'll post a picture of the finished quilt that later. Her mom was going to make the quilt, but decided it wasn't her cup of tea, so passed everything on to me and I have had so much fun with this one.

Saturday, July 26, 2008

Pin Cushions


My sewing and quilting buddies here in town, frequent one of our favorite stores and it just happens to be a Bernina Center. We attend classes, learn new techniques, both sewing and quilting and just have a lot of fun getting together. One of our monthly clubs is a Sew Creative Club. Each month the owner gives us a free fat quarter for bringing in a show-n-tell. I challenged myself to make something each month from that free fat quarter and use the finished project as my show-n-tell for the next month. The gals who work in the store all have wonderfully different personalities, and laughingly refer to themselves as the Bernina Babes. So one month I decided to make these pin cushions for each of them, designed specifically around their personalities. The labels all have different names specific to each gal in the shop, i.e., Button Babe (she loves buttons), Queen Babe (she owns the store), etc. These were so much fun to make. For our next Sew Creative meeting I think I shall make them the latest project I found in my newest quilting magazine, which is a drawstring bag with pin cushion sewn inside and a needle case. I'll post it when they are finished.

Blogs

I have been looking at other Blogs lately and have been so impressed with the creativity and beauty of some of these. I've decided to add them to my blog so that others may also enjoy them. I hope you bloggers don't mind my marketing your work. I think I shall come up with a drawing on my blog in the near future as well. Ummm??? Wonder what I could give away? Any thoughts?

Saturday, July 19, 2008

Binding Lesson 101


I have been asked recently, "how do you attach your bindings so you don't have extra thickness at the end or joining?" People get to the final few inches of attaching their bindings and then get into a "bind" (no pun intended) on how to finish so the binding doesn't have that bunched up appearance or extra fabric at the end.

First, let me say that this is by no means the only way to do it, but for me, it is the simplest method and requires no math. It is just what works best for me personally. I can assure you no matter which method you use, the Quilting Police will not come and get you. As for width when cutting, my favorite measurement is 2 1/4" wide. Then when folded in half and stitched, it rolls over the edge real nice and leaves a binding that isn't too wide or too narrow.

The next question is whether to cut the binding on the bias or not. Again a personal choice. I choose to just cut the strips, then crisscross them (as in the first picture above) to attach them. By crisscrossing the fabric strips and sewing on the diagonal, I have created my bias strips the fast and easy way. My daughter, who just recently learned to quilt, said when I explained to her my method of attaching and finishing bindings and sent her the pictures, that she was able to immediately understand how to do it. Ahhhh, life is so much better with pictures, don't you think? So, whenever I am asked how to do bindings, I just send the pictures and it seems to help others as well. I hope this was as clear to you as it was for my daughter.

Just remember that when you get within about 6-8 inches away from where you started, to stop, take out the piece and scrunch it up (technical term), criss cross the strips, pin and see how it works. If you need to adjust, it's better now before cutting off that extra fabric, then after you have sewn and cut.

REMEMBER, don't cut away that extra fabric until you are certain it's going to work.

Friday, July 11, 2008

A Doggie Tale

Four years ago we adopted a golden retriever/cocker spaniel mix from the Colorado Golden Retriever Rescue. She really is a good dog, well behaved and pretty mellow most of the time. She does, however, have her moments. She does not like being left home alone. After going thru obedience training and all the things you do to change bad habits, it's the one thing that just will not be changed. I believe it's that cocker spaniel stubbornness in her. Anyway, we have to laugh at some of the episodes we have had with her and in our efforts to try to find ways to be to leave her at home, we tried putting her in her kennel one day. Unfortunately, we didn't think about the positioning of the kennel and never dreamed that what happened would happen.

When we arrived back home, she was out of the kennel and the kennel was beyond repair. She had torn thru the little openings on the sides and totally distroyed the kennel - BUT, how? She managed to drag my husband's favorite quilt off the back of his chair (which was next to where we had placed the kennel) little by little pulling and tugging the quilt thru the openings on the side of the kennel until the entire flannel quilt was inside. YEP...the entire quilt and it was not a small one either. The quilt actually survived most of the ordeal with just a few areas that needed applique to fix the holes she had put in it.

We have since learned to never position the kennel anywhere near a chair or anything that might possibly be able to be pulled thru the openings and never, never put a quilt anywhere near it either. I have since made her her own quilt, which, by the way, she absolutely loves, but she still goes in her kennel anytime we leave the house.

Wednesday, July 9, 2008

Entrusted Treasure


I have been entrusted with a family heirloom, hand pieced quilt top, to finish for a friend. I feel so blessed to just be able to touch this wonderful work of art. This top dates back at least to the early 1800's. The friend's mother knows it was made by a great great grandmother who died in 1856. Grandma came over from Ireland and we believe brought some of these fabrics with her. The fabrics are all cottons that feel and look like old handkerchiefs or perhaps petticoat materials.

I was wondering if anyone could tell me what the block design is on this quilt? It appears to be a nine patch of some sort done on the bias. There are several blocks within the quilt, but at closer look, I believe she sewed it in bias rows. It full bed size and needs a border to finish the top and then of course I will hand quilt it for them.

I'm still thinking of how to quilt it, whether in the ditch on alternate rows, or perhaps thru the center of the blocks. Any ideas?

Tuesday, July 8, 2008

Go Green

Did you know that quilt batting has now gone green. As we all think more about conservation these days, this is a giant step for the batting industry. This soft, green batting has the same qualities as other battings, yet it's green friendly and every one pound of batting keeps 10 plastic bottles out of the landfill. For more information on going green with batting, take a look at the Quilter's Dream Batting website listed below.

Monday, July 7, 2008

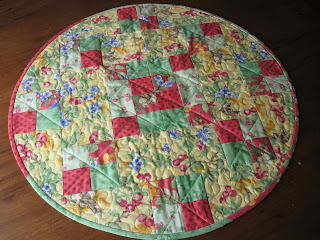
Round Table Topper

I have the privilege of knowing the two gals who invented the Roundabout ruler that I used in the making of this table topper. It is so user friendly and basically no measuring when making these wonderful toppers. Just piece and trace around the ruler to get the perfect circle. If you like to make something quick and easy, you'll love these. Once you do, you'll be hooked on them and you will get great satisfaction out of making them. These gals have also published two books with patterns and I know Leslie is currently working on a new pattern. Take a look at their website sometime.